

 My Supplies
 Get Help
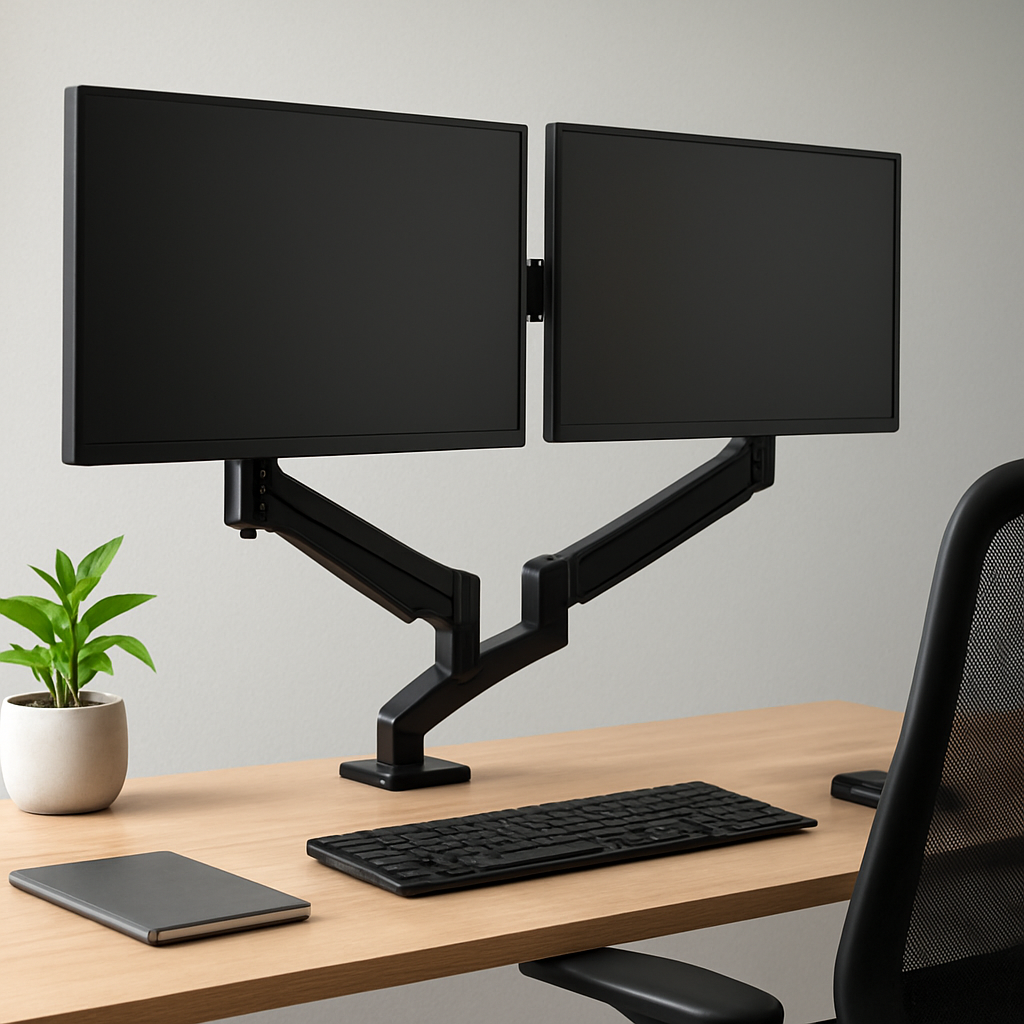
Monitor Arm Buying Guide: Improve Ergonomics and Productivity in Your Workspace
A good monitor arm does more than clear desk space—it aligns screens for comfortable, focused work across diverse setups. This guide walks procurement and facilities teams through the criteria that matter: weight and VESA compatibility, desk mounting options, and adjustable reach so you can pick a model that fits existing monitors and procurement processes. Expect practical recommendations, real-world trade-offs, and HUBZone-tailored guidance to maximize ergonomics and ROI.
1) Assess Your Workspace and Monitor Needs
Your starting point is a precise map of what you already have and what the space allows. Before browsing arms, lock in desk dimensions, available mounting space, and the weight and pattern of every monitor you plan to use.
Document each monitor's weight, its VESA pattern (75×75 or 100×100), and whether you need portrait or landscape orientation now or in the future. Note desk edge thickness, material, and whether you have a grommet hole or a built-in cable pass-through—these drive clamp vs grommet decisions and cable routing choices. For guidance on posture and setup expectations, anchor decisions to established ergonomics sources like OSHA, NIOSH, and Cornell’s monitor guide: OSHA, CDC NIOSH, Cornell Ergoguide.
- Identify desk dimensions and available mounting space
- Record current monitors: weight, VESA pattern, orientation needs
- Decide on single vs multi-monitor configurations and typical usage
- Check desk edge thickness and surface constraints to inform clamp vs grommet options
A practical example: a design team with two 27-inch displays (each ~11–12 lbs) on a 30–inch-deep desk needs a dual-arm solution with good reach and a clean cable path. They verify 100×100 VESA on both screens, ensure the arms can reach to eye level from roughly 24 inches away, and choose a clamp mount on a sturdy edge. The result is a setup that avoids neck twisting during long review cycles and keeps cables organized behind the monitor stand.
Two concrete trade-offs matter in practice: clamp mounts are quick and non-destructive to the desk but can slip on thin edges or high-density edges, while grommet mounts are more stable but require drilling and a longer installation lead time. For mobility or shared desks, a freestanding or wall-mounted option may beat a clamp if you can't alter the surface.
When you start shopping, look for a model family that covers both single- and dual-monitor configurations and supports 75×75 or 100×100 VESA with a weight range that includes your heaviest screen. This makes it easier to scale up or reconfigure a multi-monitor setup without swapping hardware.
<!– IMAGE: { "prompt": "A practical workspace showing a dual monitor arm setup on a height-adjustable desk with cable management and a clean edge clamp”, “style”: “photo realistic”, “mood”: “professional” } –>
Next, assess the key features that convert space and effort into ergonomic gains—weight capacity, reach, tilt, and the quality of cable management—before you consider specific models.
2) Key Features to Look for in a Monitor Arm
When choosing a monitor arm, you’re buying for long-term ergonomics and daily adjustability, not a one-time placement. Focus on a framework you can rely on: predictable motion, solid support, and clean setup that won’t require constant tinkering. For procurement considerations, see HUBZone-specific guidance to streamline purchasing and supplier diversity alignment. External guidelines like OSHA and NIOSH also underscore how proper alignment reduces strain and boosts productivity. OSHA guidance
- Weight capacity and VESA compatibility: Ensure each arm can handle your monitors (per-arm weight rating) and supports common patterns like 75×75 mm and 100×100 mm. If you plan future upgrades, verify the arm covers a broader weight range to avoid rework.
- Reach, extension, tilt, swivel, and rotation: Look for enough extension to place screens at a comfortable distance while keeping cables tidy. Tilt and swivel ranges should accommodate typical glare angles, and 360-degree rotation is essential for quick portrait-to-landscape shifts.
- Adjustment mechanism quality: Gas-spring arms offer smooth, one-handed adjustments and easy height changes; budget mechanical designs may lag in ease of use and can sag over time. Consider warranty and serviceability as part of total cost of ownership.
- Mounting style and desk fit: Clamp mounts rule out desk holes but require edge thickness within a specific range; grommet mounts deliver cleaner routing and sturdier support but need a desk with a dedicated hole. Check your desk’s edge profile and thickness limits before committing.
- Cable management and integration: Integrated channels or clips reduce desk clutter and simplify cleanup, but only if the path aligns with your desk depth and cable length. Poor routing can negate ergonomic gains and create new tension points.
A concrete setup example helps. A software team uses two 27-inch monitors weighing about 11–12 pounds each and shaped with standard VESA patterns. They choose a gas-spring, dual-arm setup with a clamp mount that provides roughly 12 inches of extension and 180-degree tilt range. The result is one-handed height adjustment, quick transitions to portrait for side documentation, and clean, kink-free cable routing that stays behind a compact desk.
A practical trade-off is common: higher-quality gas-spring systems deliver smoother motion and longer life but cost more up front, while budget options can work for lighter monitors but may require more frequent tweaks and replacements. In hybrid or shared spaces, prioritize models with dependable tilt resistance and simple recalibration to minimize downtime during reallocations.
To keep procurement efficient, standardize on a small family of arms that cover your monitored weights and VESA patterns. This reduces SKU proliferation, simplifies maintenance, and aligns with contract vehicles. For buyers in HUBZone programs, this approach also supports supplier-diversity goals and faster purchase cycles. HUBZone procurement guidance
When you’re evaluating candidates, verify compatibility with your desk and monitors, confirm the maximum load at the full reach, and check the ease of future adjustments. A well-chosen arm remains stable under load and offers smooth, repeatable positioning without creeping or drift. Take this as a baseline: match weight and VESA patterns first, then validate adjustability and cable routing in your actual workspace.
Takeaway: establish a short list of core features to test against your actual monitors and desk constraints, then proceed with procurement using a standardized model family. Next: align models with your procurement processes and supplier certifications to keep rollout smooth.
3) Ergonomic Setup: Achieving Optimal Posture with a Monitor Arm
Set monitor top height to eye level or just below to minimize neck strain and enable a natural gaze as you work.
Maintain an appropriate viewing distance: place the screen about an arm's length away, roughly 20-28 inches, so you can read text without leaning forward.
If your chair, desk, or keyboard tray forces awkward wrist or elbow angles, the monitor arm won't fix the underlying posture. Target neutral wrist and elbow angles, with forearms supported and wrists straight in line with the keyboard.
For dual-monitor setups, align the primary display in your direct line of sight and offset the secondary slightly to reduce continuous head turning. A practical approach is to position the main screen center-front and angle the second screen inward by 20–30 degrees.
Example: A software developer uses a 27-inch primary and a 24-inch secondary on a gas-spring dual monitor arm. The primary top edge sits about 1 inch below eye level, the secondary is angled toward the user. After two weeks, they report less neck twisting and more efficient context switching.
- Set the top edge of both screens at or just below eye level for each monitor.
- Keep the viewing distance in the 20–28 inch range and adjust arm reach accordingly.
- Ensure wrists remain neutral; adjust keyboard height and chair height to support this.
- Use a single-arm for each display in a multi-monitor setup to maximize independent adjustment.
- Plan clean cable routing and check that clamp or grommet mounts fit your desk profile.
Takeaway: Validate ergonomics during real work sessions and schedule a reassessment after installation to capture long-term benefits.
4) Cable Management and Desk Compatibility
Cable management is not an afterthought in a productive workspace. Use integrated cable guides and clips to route cords along the monitor arm and desk edge, minimizing wear and snag risks. A tidy run reduces friction during height and angle adjustments and keeps the desk clean for shared workstations. Pair cable channels with a compact under-desk tray for power and data lines so the surface stays free for keyboards and mice. For practical guidance on workplace ergonomics, see OSHA guidelines and if you are evaluating supplier programs, consider HUBZone benefits for small businesses.
Desk compatibility hinges on edge thickness and mounting surface. Clamp mounts typically fit desk edges about 0.75 to 2 inches thick and require a solid, flat edge. If you have a beveled edge or a very thick top, go grommet and route cables through the desk hole using the arm's grommet plate. A through-hole diameter of about 2 to 3 inches is common for grommets. Check for interference with drawers, cable trays, or keyboard trays and verify there is enough under-desk clearance for cable routing and the arm's movement. Some desks have integrated cable channels we can align with; if not, plan to add a slim raceway that keeps cords off the working surface.
- Best practice: Use a single cable management channel or under-desk tray to consolidate power and data lines and keep routes straight as the arm moves.
- Edge fit: Confirm desk thickness and edge profile meet the mounting method you choose, and consider a backup plan if the edge is not cleanly accessible.
- Strain relief: Route cables with proper bend radii and use zip ties or sleeves to prevent wear where the arm moves.
- Accessory planning: If a keyboard tray or docking station is in use, leave extra slack and a dedicated path to avoid snagging during adjustment.
Example: In a small design studio, two 24-inch monitors sit on a 1.75 inch thick oak desk with a clamp mount. Cables are routed through a slim under-desk channel into a single tray, and a short cable raceway keeps power and display lines tidy as the arm moves. Installation completed in under 30 minutes with minimal desk disruption and easy future reconfiguration.
Takeaway: Make cable management and desk compatibility a fixed part of the standard spec for Hubzone purchases to avoid rework and ensure reliable ergonomics and uptime.
5) Representative Monitor Arm Models by Setup
Most office rigs fall into a few practical configurations, and the right monitor-arm choice is a function of how you work, not how you talk about ergonomics. For a single-screen station, the Ergotron LX Desk Mount Monitor Arm delivers precise reach, a strong tilt/swivel range, and a clean edge-clamp that fits tight desk profiles. For dual-monitor work, the Ergotron LX Dual Desk Monitor Arm keeps two displays aligned with a shared balance system that remains stable as you skim through documents or switch between apps.
- Single monitor setup: Ergotron LX Desk Mount Monitor Arm — robust reach, 360-degree rotation, and tidy cable routing; supports most 24–27 inch displays and mid-weight panels; available in clamp or grommet mounts.
- Dual monitor setup: Ergotron LX Dual Desk Monitor Arm — two displays with symmetrical balance; independent tilt per arm; suitable for 24–32 inch monitors and common weights; keeps a tight central line for focus.
- Budget-friendly dual setup: VIVO Dual LCD Monitor Desk Mount STAND-V002 — affordable, straightforward adjustment; dual arms with tilt and swivel; basic cable management; best for lighter-weight panels and compact desks.
- Heavy-duty or large monitors: Ergotron HX Desk Monitor Arm — higher payload and wider reach for larger or ultrawide displays; rock-solid stability; higher price and footprint, but future-proof for heavier setups.
- Premium ergonomics and aesthetics: Humanscale M2 Monitor Arm — elegant design with tool-free adjustments and integrated cable routing; minimal desk clutter and very smooth motion; premium price but a cleaner, long-term fit.
Use-case snapshot: a design studio outfits one station with a dual-arm LX setup for two 24–27 inch panels and another with a single-arm LX for a 34-inch ultrawide. The team gains rapid, precise repositioning, reduces neck strain during long review sessions, and keeps peripheral gear accessible without crowding the workspace.
Takeaway: start with your current setup, then select a model that provides ample weight tolerance and adjustable reach so you can scale to heavier monitors or additional screens without a full hardware swap.
6) Procurement and Buying Tips for HUBZone Buyers
In practice, a standard spec package is the fastest path to cost control and compliance for HUBZone buyers. Define a baseline that covers weight ranges, VESA patterns (75×75 and 100×100), mounting style (clamp vs grommet), number of arms per desk, and expectations for cable management. When you align specs with your procurement contracts, you reduce back-and-forth and accelerate approvals.
- Define a standard spec package: weight range, VESA patterns, mounting type, number of arms per desk, and general cable management expectations.
- Confirm HUBZone eligibility and capture supplier diversity: request certification documentation and reference contract vehicles to ensure compliance.
- Benchmark pricing and leverage bulk terms: compare quotes from a small pool of preferred suppliers and pursue bulk discounts or extended warranties where practical.
- Plan installation and maintenance up front: include on-site installation windows, service level expectations, and a maintenance cadence to prevent downtime.
- Coordinate with procurement processes and contract vehicles: ensure the purchase fits existing contracts and approval workflows to speed things up.
Concrete example: a facilities team standardizes on a two-arm, gas-spring monitor arm with clamp mounting, supporting up to 22 lb per arm and a 100×100 mm VESA pattern. They issue a single RFQ to three HUBZone-certified suppliers through the company's approved contract vehicle, specify on-site installation, and lock in a two-year warranty. The rollout covers twelve desks and completes over a long weekend with minimal disruption and a measurable drop in neck strain after the first month.
A practical trade-off is rigidity versus flexibility. Standard spec packages speed buying but may limit options for very large, curved, or ultrawide displays. Build in a controlled exception process for the small number of desks that require a non-standard configuration, but keep the standard spec for the majority to preserve efficiency.
- Create a short spec sheet and data table with the required weight range, VESA pattern, mounting style, and maximum load per arm.
- Invite bids from three HUBZone-certified vendors and verify eligibility before selecting a supplier.
- Set up a pilot installation on a representative desk to validate fit, then scale to the full rollout.
- Lock in warranty and service terms and document a maintenance plan with review milestones.
Close coordination with procurement and facilities leaders is essential. Align the purchase with internal approval thresholds, notify affected teams about installation windows, and tie the project to broader workspace optimization goals so the gains are measurable and sustainable.
{
“@context”: “https://schema.org”,
“@graph”: [
{
“@type”: “BlogPosting”,
“@id”: “https://shop.hubzonedepot.com/monitor-arm-buying-guide-ergonomics-productivity-tips#blogposting”,
“mainEntityOfPage”: {
“@type”: “WebPage”,
“@id”: “https://shop.hubzonedepot.com/monitor-arm-buying-guide-ergonomics-productivity-tips”
},
“headline”: “Monitor Arm Buying Guide: Improve Ergonomics and Productivity in Your Workspace”,
“alternativeHeadline”: “Monitor Arm Buying Guide – Boost Ergonomics & Productivity”,
“description”: “Learn how to choose the right monitor arm to reduce neck strain, maximize desk space, and increase productivity. Compare mounts, features, and installation tips.”,
“author”: {
“@type”: “Person”,
“name”: “Elisa”
},
“publisher”: {
“@type”: “Organization”,
“name”: “Hubzone Depot Shop”,
“url”: “https://shop.hubzonedepot.com”,
“logo”: {
“@type”: “ImageObject”,
“url”: “https://shop.hubzonedepot.com/logo.png”
}
},
“datePublished”: “2026-06-07”,
“dateModified”: “2026-06-07”,
“url”: “https://shop.hubzonedepot.com/monitor-arm-buying-guide-ergonomics-productivity-tips”,
“image”: [
“https://shop.hubzonedepot.com/images/monitor-arm-guide.jpg”
],
“articleBody”: “This guide helps procurement and facilities teams choose monitor arms that improve ergonomics and productivity. Start by assessing desk dimensions, monitor weights, and VESA patterns (75×75 or 100×100), and decide between clamp, grommet, freestanding, or wall mounts. Key features to prioritize are weight capacity, reach/extension, tilt/swivel/rotation, gas-spring vs mechanical adjustments, and integrated cable management. For ergonomics, set the top of the monitor at or just below eye level, maintain a viewing distance of about 20–28 inches, and align primary displays center-front with secondaries angled 20–30 degrees. Cable management and desk compatibility (edge thickness, under-desk clearance, grommet hole size) are essential to preserve motion and prevent wear. Representative models include Ergotron LX (single and dual), VIVO STAND-V002 (budget dual), Ergotron HX (heavy-duty), and Humanscale M2 (premium). For HUBZone buyers, standardize a spec package (weight range, VESA, mount type, cable management), verify supplier certifications, benchmark pricing, and plan installation and maintenance. Pilot a few desks, capture warranty/service terms, and allow a controlled exception process for non-standard setups.”
},
{
“@type”: “FAQPage”,
“@id”: “https://shop.hubzonedepot.com/monitor-arm-buying-guide-ergonomics-productivity-tips#faq”,
“mainEntity”: [
{
“@type”: “Question”,
“name”: “How do I determine the right monitor arm for my workspace?”,
“acceptedAnswer”: {
“@type”: “Answer”,
“text”: “Map desk dimensions and mounting space, record each monitor’s weight and VESA pattern, decide on single vs multi-monitor configurations, and check desk edge thickness to choose clamp vs grommet or freestanding mounts.”
}
},
{
“@type”: “Question”,
“name”: “What are the most important features to look for in a monitor arm?”,
“acceptedAnswer”: {
“@type”: “Answer”,
“text”: “Prioritize per-arm weight capacity and VESA compatibility, extension/reach, tilt/swivel/rotation range, adjustment mechanism quality (gas-spring preferred for smooth one-handed moves), and integrated cable management.”
}
},
{
“@type”: “Question”,
“name”: “How should I set up monitors for optimal ergonomics?”,
“acceptedAnswer”: {
“@type”: “Answer”,
“text”: “Set the top edge of the primary monitor at or just below eye level, maintain about an arm’s length distance (20–28 inches), keep wrists neutral with proper keyboard/seat height, and angle secondary displays inward 20–30 degrees to reduce head turning.”
}
},
{
“@type”: “Question”,
“name”: “What are common mounting trade-offs between clamp and grommet mounts?”,
“acceptedAnswer”: {
“@type”: “Answer”,
“text”: “Clamp mounts are non-destructive and quick to install but can slip on thin or irregular edges; grommet mounts are sturdier and cleaner for routing but require a desk hole and longer installation lead time.”
}
},
{
“@type”: “Question”,
“name”: “How can HUBZone buyers streamline procurement of monitor arms?”,
“acceptedAnswer”: {
“@type”: “Answer”,
“text”: “Create a standard spec package covering weight ranges, VESA patterns, mount type, cable management expectations, invite bids from HUBZone-certified suppliers, pilot installations, and lock in warranty and service terms to simplify rollout and compliance.”
}
}
]
},
{
“@type”: “SpeakableSpecification”,
“@id”: “https://shop.hubzonedepot.com/monitor-arm-buying-guide-ergonomics-productivity-tips#speakable”,
“xpath”: [
“/html/body//h1”,
“/html/body//p[@class=’introduction’]”
],
“cssSelector”: [
“h1”,
“p.introduction”
]
}
]
}article blockquote,article ol li,article p,article ul li{font-family:inherit;font-size:18px}.featuredimage{height:300px;overflow:hidden;position:relative;margin-top:20px;margin-bottom:20px}.featuredimage img{width:100%;height:100%;top:50%;left:50%;object-fit:cover;position:absolute;transform:translate(-50%,-50%)}article p{line-height:30px}article ol li,article ul li{line-height:30px;margin-bottom:15px}article blockquote{border-left:4px solid #ccc;font-style:italic;background-color:#f8f9fa;padding:20px;border-radius:5px;margin:15px 10px}article div.info-box{background-color:#fff9db;padding:20px;border-radius:5px;margin:15px 0;border:1px solid #efe496}article table{margin:15px 0;padding:10px;border:1px solid #ccc}article div.info-box p{margin-bottom:0;margin-top:0}article span.highlight{background-color:#f8f9fb;padding:2px 5px;border-radius:5px}article div.info-box span.highlight{background:0 0!important;padding:0;border-radius:0}article img{max-width:100%;margin:20px 0}