

 My Supplies
 Get Help
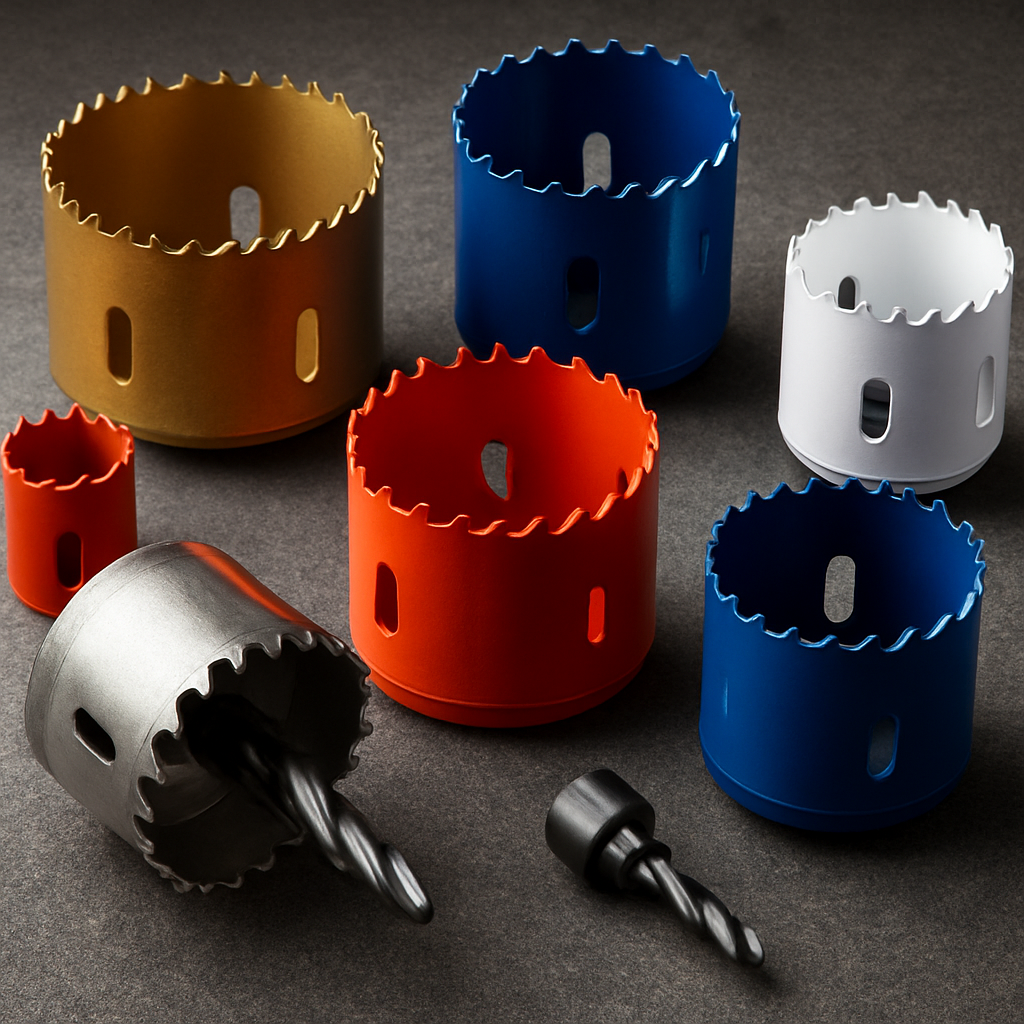
Hole Saws Buying Guide: Sizes, Materials, and Best Uses for Pros
For professionals who specify tools and run fleets, hole saws are a small purchase that can cause big downtime when the wrong size, material, or arbor is chosen. This guide cuts straight to the decisions that matter: matching bi-metal, carbide, diamond, and grit options to wood, metal, tile, and masonry; which diameters to stock by trade; and the RPM, feed, and lubrication windows that actually extend tool life. You will get concrete size recommendations, operating parameters, replacement thresholds, and procurement steps to lower cost per hole and keep crews moving.
1. Quick reference: common hole saw sizes and trade uses
Key point: Stock hole saws by function, not by every available diameter. A small set of well chosen diameters covers most conduit, plumbing, HVAC, and access needs; carrying every size wastes capital and creates tool-room clutter.
Diameter to use-case mapping
| Diameter | Typical trade uses and notes |
|---|---|
| 3/4, 1, 1-1/4 inch | Conduit and low-voltage cable access, thermostat and sensor lead entries. Use thin-wall sheet metal hole saws or bi-metal for short runs. |
| 1-1/2, 2, 2-1/2 inch | Plumbing cleanouts, small pipe penetrations, standard single-gang electrical feed-throughs. Keep both bi-metal and a spare arbor with 1/4 inch pilot for stability. |
| 2-3/8, 2-1/2, 2-11/16 inch | Common electrical box knockouts and firestop penetrations. Match arbor thread and pilot size to box templates. |
| 3, 4, 5 inch | HVAC collars, larger access panels, and mechanical service penetrations. Prefer heavy duty bi-metal or carbide for frequent metal work. |
| 6 inch and up | Floor drains, large ductwork, service ports and retrofit patches. Use drill press or hydraulic drive on large diameters when precision and crew ergonomics matter. |
Practical insight: For facilities with mixed trades, prioritize the 1-1/2 to 4 inch cluster. This range covers most recurring needs and yields the best return on branded bi-metal or contractor packs from manufacturers like Milwaukee or DEWALT. Buying a full hole saw kit with dozens of seldom-used small diameters is a common procurement mistake.
- Stocking recommendation for a small contractor: keep 8 SKUs – 3/4, 1, 1-1/4, 1-1/2, 2, 2-1/2, 3, 4 inch. Reorder when inventory falls below 2 pieces per SKU.
- Stocking recommendation for a medium facilities team: keep 12 SKUs plus 2 arbors – add 2-3/8, 2-11/16, 5, 6 inch. Use a quick-change arbor to reduce downtime on multi-crew jobs.
- Trade-specific note: HVAC crews should invest in extra 3 and 4 inch heavy duty bi-metal saws and a spare pilot bit; electrical crews should prioritize the 2-3/8 and 2-11/16 sizes used for box knockouts.
Tradeoff to accept: Buying premium carbide or diamond saws for every diameter is unnecessary unless you cut abrasive or hardened surfaces daily. For mixed-use fleets, pair mid-range bi-metal hole saws for metal and wood with targeted carbide or diamond hole cutters for tile, porcelain, and stainless work.
Concrete example: An HVAC technician installing rooftop duct collars will typically use a 4 inch hole saw on sheet metal and a 4 inch diamond grit saw for passing through roof tile. On a retrofit job the technician carried two 4 inch saws – one Lenox bi-metal for the duct and one Bosch diamond-grit for the tile – which avoided swapping teeth mid-day and kept the crew on schedule.
2. Hole saw construction and material types explained
Bottom line: the physical construction of a hole saw – the tooth material, how the teeth are attached, and the body design – determines cutting speed, heat tolerance, and how the saw fails. Choosing the wrong construction is the single biggest cause of premature waste and downtime in professional shops.
Key construction variables that matter on the job
Tooth metallurgy and attachment: Bi-metal saws use a high-speed steel tooth strip welded to a spring steel body for flexibility; carbide-tipped saws braze carbide teeth or inserts onto a steel body for abrasion resistance; diamond and carbide-grit cups use an abrasive matrix bonded to a steel shell. How teeth are joined determines whether the saw tolerates shock, bending, or heat cycling.
- Bi-metal: best for mixed wood, plastics, thin and mild steel. Trades value the flexibility and easy re-sharpening in some brands, but the teeth dull on abrasive materials.
- Carbide-tipped: required for hardened steels and production runs on stainless. Far higher initial cost but much longer life on tough alloys; cannot be re-sharpened cheaply.
- Carbide-grit / diamond-grit: thin, aggressive cutting for tile, porcelain, and fiberglass where teeth would fail. Faster through abrasive substrates but wear quickly on reinforced concrete.
- Diamond core / continuous rim: intended for masonry, tile, and concrete. Use wet where possible; dry-cut diamond cups are useful for short, portable work but have shorter life.
Practical trade-off: choose bi-metal for generalist crews and bulk metal/wood work because the cost-per-hole is low and failures are gradual. Buy carbide-tipped or diamond for predictable, high-volume specialty tasks; they pay back only when hole counts or material abrasiveness justify the premium.
Concrete example: on a plant retrofit cutting 304 stainless conduit plates, the crew switched from bi-metal to Starrett carbide-tipped hole saws. Running at low RPM with cutting oil, a single carbide-tipped 4 inch saw produced several hundred clean holes before signs of wear, avoiding repeated saw swaps and rework that had been common with bi-metal alternatives.
Interface and body details you cannot ignore: kerf width, gullet size, and cup depth affect chip evacuation and heat buildup; heavy-duty saws use larger arbors and thicker bodies to resist flex on large diameters. If you mismatch arbor or pilot geometry you will get walking, chatter, and broken pilots even with the correct tooth material.
Match tooth type to substrate and the expected hole count. Overbuying carbide wastes budget; underbuying it costs time and creates scrap.
3. Matching hole saw type to material: specific recommendations
Choose by substrate and expected hole count. The right hole saw is the one that survives the job without costing hours in swaps or rework. For procurement that matters: plan around the dominant materials your crews see and accept that one diameter often needs two saw types (a generalist bi-metal and a specialty carbide or diamond) rather than one do-it-all saw.
Material-specific guidance and limits
Wood and soft materials: Use fast-cut bi-metal or purpose wood hole saws from Irwin or Diablo for throughput and clean evacuation. Use higher RPMs (typically 1,500–3,500 for small diameters), backer board to prevent tearout, and a brad-point pilot bit for precision. Avoid carbide here; it is overkill and brittle when hit by knots.
Mild steel and thin sheet metal: High-quality bi-metal such as Lenox Fast Cut or the Milwaukee Hole Dozer is the practical choice. Run low RPM (250–700 depending on diameter), use cutting oil, and let the saw do the work—force causes heat and tooth failure. For thin sheet, prefer tooth geometries made for thin-wall to reduce grabbing and burrs.
Stainless and hardened steels: Buy carbide-tipped or premium bi-metal rated for stainless (Starrett and Bosch offer carbide-tipped models). Operate at very low RPM (100–400 on larger diameters), use constant cutting fluid, and use intermittent feeds to avoid welding chips to teeth. Carbide lasts far longer but tolerates shock poorly—avoid plunging or bending the arbor.
Masonry, tile, and concrete: Use diamond-core or diamond-grit cups (Bosch Diamond Core, DEWALT diamond) and wet-cut where possible for life and chip control. For porcelain and glazed tile choose continuous-rim diamond to avoid chipping; for block and brick use segmented/wet cores. Dry diamond cups work short-term, but expect far shorter life and more dust control problems.
Composites and fiberglass: Carbide-grit or diamond-grit hole cutters are usually required. Keep RPMs moderate to avoid melting resin, use gentle feed, and back the piece to prevent delamination. Bi-metal teeth will dull almost immediately on abrasive composite fillers.
- Quick pairing cheat sheet: Wood → bi-metal/wood saw; RPM 1,500–3,500; standard threaded arbor.
- Sheet metal → Lenox/Milwaukee bi-metal; RPM 250–700; use thin-wall tooth geometry and a low-profile pilot.
- Stainless/hardened → carbide-tipped; RPM 100–400; heavy-duty arbor and continuous cutting oil.
- Tile/concrete → diamond core/grit; wet cutting where possible; use drill platform or wet-system arbor.
- **Composites → carbide-grit; moderate RPM; backer and variable feed to prevent melt/delam.
Practical trade-off: Carrying a matched pair of saws for the busiest diameters—one branded bi-metal plus a carbide or diamond counterpart—costs more up front but saves time and eliminates emergency reorders. For procurement teams, that means stocking duplicates for 2–4 high-frequency diameters rather than buying single units of many seldom-used sizes.
Real-world example: A facilities crew replacing ceiling fixtures on a tile ceiling used a 2-3/8 inch DEWALT diamond hole saw to cut the tile and a Lenox bi-metal 2-3/8 inch for the underlying steel pan. Keeping both saws on the cart avoided mid-job blade swaps, prevented cracked tiles, and cut the fixture-change time by roughly 30 percent on that building.
Judgment call many make incorrectly: Buying the most expensive carbide or diamond saw for every diameter wastes budget when the job mix does not demand it. The sensible approach is to classify jobs by substrate and hole count, then assign carbide/diamond only to the predictable, high-wear tasks where the tool repays its cost in reduced downtime and scrap.
Next consideration: confirm arbor thread, pilot-bit style, and expected hole counts before placing orders so kits arrive job-ready and crews do not improvise adapters on site.
4. Arbor, pilot bit, and drill compatibility
Direct point: Arbor, pilot bit, and driver choice determine whether a hole saw cuts straight, lasts, and can be changed fast on the job. Mismatched arbors or the wrong pilot geometry cause walking, vibration, broken pilots, and ruined workpieces far more often than poor tooth metallurgy.
Arbor types and the tradeoffs that matter
Threaded arbors vs quick-change: Threaded mandrels are the workhorse for larger diameters and heavy metal cutting because they clamp tightly and tolerate side load. Hex-shank quick-change arbors speed swaps for high throughput on small to medium saws but are weaker under sustained torque – they are a productivity tool, not a heavy-duty substitute. For masonry cores use dedicated wet-core mandrels or SDS adapters built for axial load.
Pilot bit geometry and common failure modes
Pilot selection matters: Use a brad-point or reduced-walk pilot for precise starts in wood and tile, and a split-point or heavy-duty twist pilot for metal to resist skating. Replaceable pilots are worth the small extra cost because a broken pilot is cheaper than regrinding a saw or risking arbor damage. Beware pilots that extend past the cup on deep cuts – they bind in swarf and snap.
Driver platform, chuck, and RPM compatibility
Match torque and speed to diameter and material. Small hole saws work well with a cordless 18V brushless drill using a hex quick-change when cutting wood or thin metal. For larger diameters, stainless, or masonry, use a 1/2 inch corded drill or a drill press that holds steady at low RPM. Do not use hammer function with hole saws unless you are using a core bit designed for masonry.
- Compatibility checklist: Verify arbor thread standard against the saw before ordering to avoid on-site adapters
- Pilot bit check: keep spare
pilot drill bit for holesawsmatched to each arbor, prefer replaceable pilots for high-use kits - Drill capacity: confirm chuck aperture and torque curve – many impact drivers have too little sustained torque for 3 inch plus cuts
- Clearance and feed: ensure back of arbor clears the saw cup and plan for chip evacuation on deep cuts
| Arbor Type | Typical max diameter | Best driver | Primary weakness |
|---|---|---|---|
| Threaded mandrel | Up to 6 inch and larger with heavy bodies | 1/2 inch corded drill or drill press | Requires correct thread match and is slower to swap |
| Hex quick-change | Up to 3 inch typical | Cordless 18V brushless drill or impact driver for small jobs | Lower torque tolerance on long runs |
| SDS/adapters and wet-core mandrel | 6 inch plus for masonry cores | Hammer drill or dedicated core drill | Specialized, heavier and more expensive |
Concrete example: An electrical gang runs frequent 2-3/8 inch knockouts on sheet metal. They standardized on a hex quick-change arbor and an 18V brushless drill for speed, but keep a threaded heavy-duty mandrel for jobs where they hit thicker steel or stainless. That one small procurement decision cut swap time on routine installs and prevented repeated pilot breakage on tougher panels.
Quick-change systems increase crew throughput, but match the arbor strength to the saw diameter and substrate. Speed without matching torque is a false economy.
Next consideration: after standardizing arbors and pilots, document the drill platform and maximum RPM per saw in your tool room so crews cannot mix high RPM with large diameter hole saws on the same driver.
5. Operating parameters that extend hole saw life
Key point: tool life is mostly decided at the spindle — speed, feed pressure, and cooling outweigh brand claims when you want consistent production. Set the driver and technique to the material and diameter before you pull the trigger; getting those three wrong accelerates wear far faster than cheap teeth or a worn arbor.
Surface speed first, then RPM
Match surface speed: aim for an appropriate cutting speed in feet per minute (SFM) for the substrate, then calculate RPM from the hole saw diameter with the formula RPM = (SFM 12) / (π D). Working to SFM keeps you honest — larger diameters must run much slower than small ones to hit the same cutting conditions.
Practical ranges to use as starting points: nonferrous alloys and wood run at higher SFM than ferrous metals; stainless and hardened steel require the lowest SFM. Treat the ranges as starting points and back off under load or when chips heat up. If your driver stalls at this speed, switch to a platform with more low-end torque rather than increasing feed.
Feed, duty cycle, and cooling
Feed control matters more than brute force. Apply steady, moderate pressure so the teeth cut cleanly; aggressive plunge or constant heavy push generates heat and causes tooth welding or brazing. On metals, use an intermittent pecking rhythm to break chips and clear the gullets — this is not slower in total time once you eliminate rework.
Cooling and lubrication are non-negotiable on metal and preferred for long diamond runs. Use a light cutting oil for steels and a water feed or wet-core system for diamond work in masonry and tile. Dry-running diamond cups are convenient but shorten life dramatically; budget for wet systems when you hit routine masonry.
- Quick fixes for a saw that dulls fast: step the RPM down, increase lubrication, reduce feed, or swap to a carbide or diamond cutter if abrasive material is present.
- Cordless vs corded: cordless tools give mobility but often lose RPM under load; for long runs on large diameters or stainless choose a corded variable-speed drill or drill press.
- Arbor torque check: snug threaded mandrels to spec and inspect for runout; a bent arbor multiplies heat and kills teeth quickly.
Concrete example: A maintenance crew switched from an 18V cordless to a corded variable-speed drill for repetitive 4 inch stainless penetrations. By calculating SFM and running at the resulting low RPM with continuous cutting oil and short pecks, they extended each carbide-tipped saw's life to several hundred holes and eliminated the frequent tooth glazing they had been fighting.
Practical trade-off: run slower with the right cooling and you get longer tool life; run faster and risk shorter life plus more scrap. Invest in the right arbor/drill platform before upgrading blade metallurgy.
6. Safety, setup, and cutting techniques for professionals
Start with verification, not the drill. Confirm what lies behind the surface, isolate services, and pick the cutting method that controls hazard first—then worry about speeds or tooth metallurgy. This order saves crews from the two common failure modes: hidden services and uncontrolled dust or fluid exposure.
Pre-job setup and verification
Survey and control. Use multi-sensor detectors, pull junction-box layouts, and check building drawings when available. If the work is in an occupied space, add containment and a HEPA vacuum to the setup for masonry or tile cuts.
- Isolation: lockout/tagout electrical and mechanical services when cutting near wiring, pipes, or sprinkler mains.
- Backing and support: use sacrificial plywood or a thin sacrificial plate behind fragile finishes to prevent breakout and to support the arbor during final breakthrough.
- Drill platform: for vertical ceiling holes or long runs, use a drill press, drill guide, or centering jig rather than relying on the pilot to hold alignment.
- Dust and water plan: pick wet cutting with a GFCI and ground-fault-aware setup for diamond hole saws, or use dust extraction collars and HEPA vacuums when wet cutting is impractical.
Cutting techniques that reduce rework and increase safety
Controlled engagement beats brute force. Begin at low speed to seat the pilot, then increase to target RPM for the saw and substrate. For thin laminates or drywall, cut the face layer at reduced RPM or cut from the back to avoid splintering.
- Pilot strategy: prefer a short, replaceable
pilot drill bit for holesawssized to the arbor collar; when precision matters, use a guide bushing or centering jig instead of relying solely on the pilot. - Intermittent cutting for metal: on thick or stainless surfaces, use short engagement bursts and pause to clear chips—this controls heat without needing constant high-pressure coolant systems.
- Stabilization: for large diameter hole saws fit an arbor stabilizer or use a two-person technique to control torque reaction and prevent sudden grab.
- Chip evacuation: reverse the saw occasionally off the cut to clear swarf, or withdraw to let a vacuum clear chips; do not bury the pilot in chips on deep cuts.
Trade-off to accept: wet cutting extends diamond cup life and suppresses dust, but it forces electrical safety controls and sometimes slows productivity. If the site cannot support water containment and GFCI protection, budget for more frequent dry-cup replacement and stronger dust control measures.
Concrete example: During an occupied hospital corridor retrofit the mechanical crew needed multiple 2 inch penetrations through ceramic tile and thin concrete backer. They used a small diamond hole saw with a continuous water feed, a portable pump into a contained basin, and a HEPA vacuum pulling at the source. The extra setup time prevented contamination in adjacent areas and avoided rejection from infection control inspectors.
Do not trust the pilot alone for alignment on critical or finished surfaces — use a guide or backing plate. Pilot bits are convenience tools, not precision jigs.
7. Maintenance, lifecycle, and procurement strategy
Measure life by holes, not by feel. For professional hole saws fleets the only reliable replacement signal is a tracked hole count combined with a short visual inspection. Track holes-per-saw by diameter and tooth type, log any sudden increases in feed force or chatter, and retire tools when cutting quality or cycle times degrade noticeably.
Inspection checklist (daily or after heavy runs)
- Tooth condition: look for rounded tips, missing carbide inserts, or glazed edges — these reduce cutting efficiency and increase heat.
- Gullet and rim: check for packed chips, crushed gullets, or uneven rim wear that indicate heat or feed problems.
- Arbor and thread fit: verify there is no play, stripped threads, or excessive runout at the mandrel.
- Pilot fit and straightness: replace bent or mushroomed pilots; broken pilots are cheap compared with a ruined arbor or out-of-square hole.
- Cut quality: increased burrs, burning, or slow advance per pass are practical signals to stop and inspect.
Practical trade-off: resharpening bi-metal saws is only worthwhile at scale and with the right shop equipment; carbide-tipped and diamond cups are usually replaced rather than reworked. Budget for replacement parts (pilot bits, arbors, pilots) in the same procurement cycle as new saws — missing small parts kills uptime faster than a dull cup.
Cost-per-hole calculation you can use today. Compute break-even by dividing total cost (saw + expected arbor/pilot share) by expected holes. Example: a $40 bi-metal that does 100 holes on abrasive sheet steel costs $0.40/hole; a $180 carbide-tipped saw that does 1,000 holes costs $0.18/hole. If your operation will produce hundreds to thousands of the same holes, the premium cutter pays back — otherwise the cheaper saw with good technique wins.
Inventory strategy that reduces emergency buys. Standardize on two arbor families (a heavy threaded mandrel and a quick-change hex) and maintain a 14–30 day buffer for high-use diameters. Use days-of-supply reorder rules tied to historic hole counts rather than fixed unit thresholds to avoid overstocking seldom-used sizes. Bundle arbors, spare pilots, and appropriate lubricants in each SKU so crews get job-ready kits.
Maintenance workflow to preserve life. Clean saws after each use, remove swarf, apply a light protective oil for storage, and run a quick runout check before installing. Tag saws that have logged high-hole counts or been used on abrasive substrates and route them to a tool crib for reassignment or disposal. Consider QR-code tracking on saws so crews scan on issue and return — the data quickly shows where carbide makes sense.
Concrete example: A university facilities team audited 90 days of cutting and found three diameters accounted for 70 percent of holes. They standardized those diameters with matched threaded mandrels and bought two extra carbide units for the busiest diameter. By pre-bundling arbors, pilots, and cutting oil they eliminated same-day emergency buys and reduced crew downtime on retrofit runs.
Buy premium cutters where projected hole counts exceed the break-even point; otherwise optimize technique, lubrication, and arbor quality first.
Next consideration: run the numbers for your common substrates now — a short audit and SKU consolidation will reveal where a higher upfront spend on carbide or diamond reduces total cost per hole and eliminates costly mid-job improvisation.
8. Brand and product recommendations for common professional scenarios
Practical rule: pick a brand by the routine material and hole count, not by marketing. One good bi-metal set and one purpose-built carbide or diamond cutter for the busiest diameters will outperform a cupboard of mismatched cheap saws in uptime and total cost per hole.
Generalist contractor / service crews
Recommendation: stock a mid-range bi-metal hole saw set and a compact diamond-grit option for tile. Brands that hit the sweet spot are DEWALT bi-metal contractor packs for wood/metal versatility and Milwaukee Hole Dozer for frequent sheet-metal work; add a Bosch or DEWALT diamond-grit 2–4 inch cup for finish-surface penetrations. Use a hex quick-change arbor for speed on small to medium diameters, but keep one threaded mandrel for any heavier-gauge work.
High-volume metal fabrication and retrofit
Recommendation: go premium on metallurgy and arbors. For recurring holes in mild and stainless steels choose Lenox Fast Cut bi-metal for mild steels and Starrett or Bosch carbide-tipped models for stainless and harder alloys. Pair these with heavy threaded mandrels and a corded, high-torque drill platform to preserve carbide life and avoid pilot-breakage. Expect to pay more up-front but gain predictable life and fewer interruptions.
Tile, masonry, and exterior envelope specialists
Recommendation: build around diamond core technology. Bosch Diamond Core cups and DEWALT diamond hole saws are the practical choices for porcelain, glazed tile, and concrete; use wet-core mandrels or portable wet systems for best life. For small, awkward penetrations consider diamond-grit hole cutters rather than full continuous-rim cores to reduce setup complexity on scaffolds or lifts.
Trade-off to accept: diamond and carbide pay off only when use is predictable. If your crew does tile or stainless work less than monthly, a focused pool of rented or centrally issued premium cutters reduces capital tied up in slow-moving SKUs.
Fleet/maintenance managers buying for mixed trades
Procurement move: standardize on two core hole saw families (a workhorse bi-metal from DEWALT or Milwaukee and a carbide/diamond specialist) and require arbors and spare pilot drill bit for holesaws be bundled. This reduces adapter errors and emergency buys and keeps crews job-ready across materials.
- Quick judgment: prefer Milwaukee/Lenox for aggressive sheet-metal cycles, Starrett/Bosch for carbide needs, and DEWALT for broad contractor kits.
- Arbor pairing: mandate one threaded mandrel per kit for heavy work and one hex quick-change for routine installs.
- Stocking tip: duplicate the two busiest diameters per crew rather than buying every odd size once.
Concrete example: A municipal HVAC shop with predictable 3 and 4 inch duct penetrations standardized on Milwaukee Hole Dozer bi-metal for sheet metal and purchased Bosch diamond-grit 3 and 4 inch cutters for roof tile transitions. They kept two threaded mandrels and one quick-change per van. The result: fewer mid-job returns for spare cutters and a reliable parts budget tied to known hole counts.
Buying judgment — avoid buying premium carbide/diamond for every diameter. Spend on premium where hole counts and material abrasiveness guarantee payback; standardize the rest on quality bi-metal kits and proper arbors.
{
“@context”: “https://schema.org”,
“@type”: “BlogPosting”,
“mainEntityOfPage”: {
“@type”: “WebPage”,
“@id”: “https://shop.hubzonedepot.com/hole-saws-buying-guide”
},
“headline”: “Hole Saws Buying Guide: Sizes, Materials & Uses”,
“description”: “Explore our comprehensive Hole Saws Buying Guide. Discover sizes, materials, and best uses for professional projects. Shop the best options now!”,
“image”: [
{
“@type”: “ImageObject”,
“url”: “https://example.com/image1.jpg”,
“caption”: “Photo realistic image of a workshop layout showing a labeled set of hole saws arranged by diameter from 3/4 inch to 6 inch, with arbors and pilot bits nearby on a pegboard.”
},
{
“@type”: “ImageObject”,
“url”: “https://example.com/image2.jpg”,
“caption”: “Photo realistic close-up of four hole saws arranged side-by-side: a bi-metal with stamped teeth, a carbide-tipped saw with discrete carbide inserts, a diamond-core cup showing continuous rim, and a diamond-grit hole saw.”
}
],
“author”: {
“@type”: “Person”,
“name”: “Elisa”
},
“publisher”: {
“@type”: “Organization”,
“name”: “Hubzone Depot Shop”,
“logo”: {
“@type”: “ImageObject”,
“url”: “/images/logo.png”
}
},
“datePublished”: “”,
“dateModified”: “”,
“@graph”:[
{
“@context”:”https://schema.org”,
“@type”:”FAQPage”,
“@id”:”https://shop.hubzonedepot.com/hole-saws-buying-guide#faq1″,
“@graph”:[
{
“@type”:”Question”,
“@id”:”https://shop.hubzonedepot.com/hole-saws-buying-guide#faq1-q1″,
“_questionText”:”What are the common hole saw sizes and trade uses?”,
“_acceptedAnswer”:{
“@type”:”Answer”,
“_text”:”Stock hole saws by function, not by every available diameter…”
}
},
{
“@type”:”Question”,
“@id”:”https://shop.hubzonedepot.com/hole-saws-buying-guide#faq1-q2″,
“_questionText”:”How does hole saw construction affect performance?”,
“_acceptedAnswer”:{
“@type”:”Answer”,
“_text”:”The physical construction of a hole saw – the tooth material, how the teeth are attached…”
}
},
{
“@type”:”Question”,
“@id”:”https://shop.hubzonedepot.com/hole-saws-buying-guide#faq1-q3″,
“_questionText”:”What are some material-specific recommendations for hole saws?”,
“_acceptedAnswer”:{
“@type”:”Answer”,
“_text”:”Choose by substrate and expected hole count. The right hole saw is the one that survives the job without costing hours in swaps or rework…”
}
}
]
},
{
“@context”:”https://schema.org/”,
“@type”:”SpeakableSpecification “,
“__speakable”:{
“__cssSelector”:[“h1″,”p.introduction”]
}
}
]
}article blockquote,article ol li,article p,article ul li{font-family:inherit;font-size:18px}.featuredimage{height:300px;overflow:hidden;position:relative;margin-top:20px;margin-bottom:20px}.featuredimage img{width:100%;height:100%;top:50%;left:50%;object-fit:cover;position:absolute;transform:translate(-50%,-50%)}article p{line-height:30px}article ol li,article ul li{line-height:30px;margin-bottom:15px}article blockquote{border-left:4px solid #ccc;font-style:italic;background-color:#f8f9fa;padding:20px;border-radius:5px;margin:15px 10px}article div.info-box{background-color:#fff9db;padding:20px;border-radius:5px;margin:15px 0;border:1px solid #efe496}article table{margin:15px 0;padding:10px;border:1px solid #ccc}article div.info-box p{margin-bottom:0;margin-top:0}article span.highlight{background-color:#f8f9fb;padding:2px 5px;border-radius:5px}article div.info-box span.highlight{background:0 0!important;padding:0;border-radius:0}article img{max-width:100%;margin:20px 0}